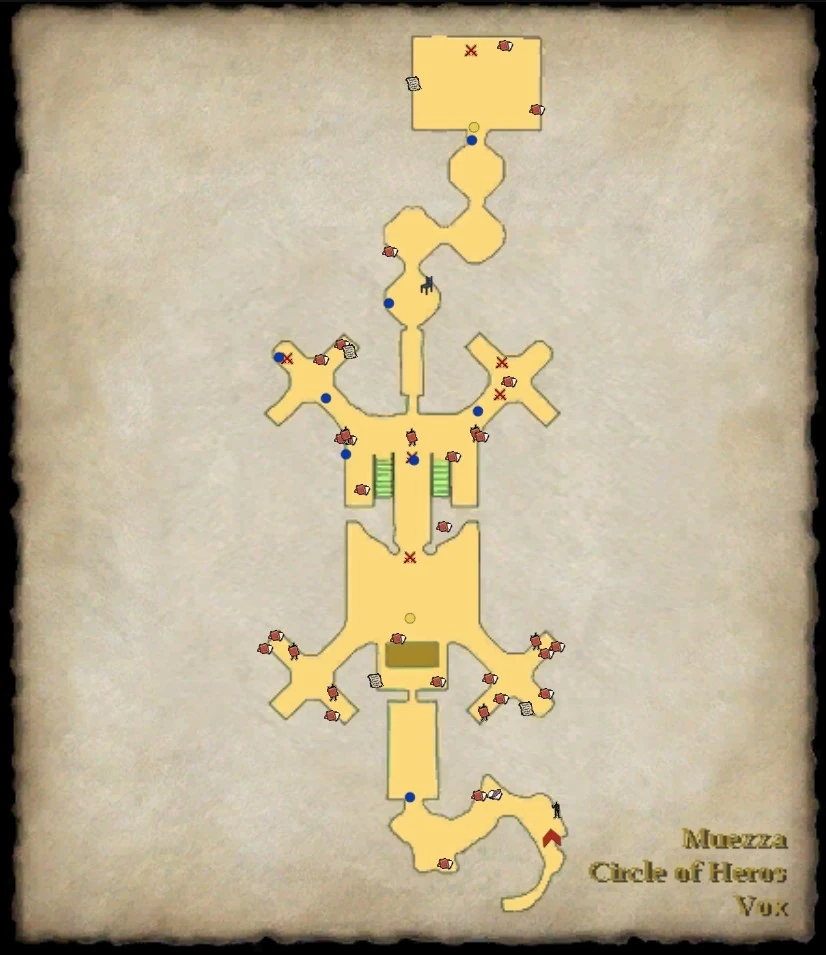
The hardest of the 3 Guk zones, with many large groups, and some long fights, so 2 priests, a bard, and an enchanter is ideal, with the rest of the group being the tank and one big DPS (i.e. one AoE DPSer).
Access to Final Boss: At the beginning of the zone is an ancient froglok sage ( -4, -1, -25 ) Copy/waypoint -4.01, -0.51, -24.90. Speak to him. He will open the doors to follow-on areas as you proceed through the dungeon.
Trogoldon Greck is located at ( 65, -8, -144 ) Copy/waypoint 64.85, -8.04, -143.60. Loot his body to obtain the large skull key you will need to progress further in the zone.
Spawned after completing a ring event, with wave upon wave of mobs. To begin the ring event, kill the two guards on the ramp. No real tricks, surviving the five waves prior is all.
After killing Trogoldon, speak with an ancient froglok sage at ( 66, -18, -106 ) Copy/waypoint 66.12, -18.18, -106.32.
If you failed to speak with the sage at the beginning of the zone as you started, you can go back to the front, talk to him, then wait until he gets to his next location and talk to him again.
Mrogold Minosk is located at ( 64, 12, -191 ) Copy/waypoint 64.28, 11.90, -191.47. This is another straightforward mob, her damage is nearly all crush. In the chest she drops is the troll shackle keyring you will need to progress further in the zone.
To spawn, you must again defeat eight waves of attackers that appear on the ramps below Mrogold.
There will be two encounters per wave, coming from the east and west.
You may want to fight at the bottom of the ramps (perhaps tanking between the two braziers at the base of the ramp) and try using crowd control on one group (mez, ideally) while you kill the other. However, one player (normally the tank), is frequently ported to the top ( 65, 12, -182 ) Copy/waypoint 65.02, 11.90, -182.36, and needs to run/jump back down, or you can fight near that spot.
Gruuper Groo is located at ( 123, -8, -238 ) Copy/waypoint 122.83, -8.11, -238.11, and does some heat and poison damage. He's behind an anvil, which can block line of sight, so position accordingly.
Click on a key chest found in the Inner Yard then click on the gate to access the Strongforge.
Once Gruuper has been killed, have everyone click the forge to gather a stack of ten Chaos Sparks, which will be needed for later fights.
Ferhustr Frupdor and Lunchmeat are chasing one another around a table at ( 21, -8, -236 ) Copy/waypoint 21.49, -8.11, -236.38.
Ferhustr is immune to damage. You can either use a Chaos Spark from the forge for a 25 second buff that allows you to damage him, or else wait until Lunchmeat casts an arcane debuff that allows the recipient to damage Ferhustr.
If you need more Chaos Sparks, one person can run back to the forge and grab more, but the forge is beyond the leash point for this encounter, so the whole group can't go.
It's possible to keep Lunchmeat alive but mezzed or just taunted with no damage while fighting Ferhustr, and allows him to cast the debuff needed to damage Ferhustr.
After killing Ferhustr and Lunchmeat, speak with an ancient froglok sage at ( 65, -8, -203 ) Copy/waypoint 64.77, -8.03, -202.58.
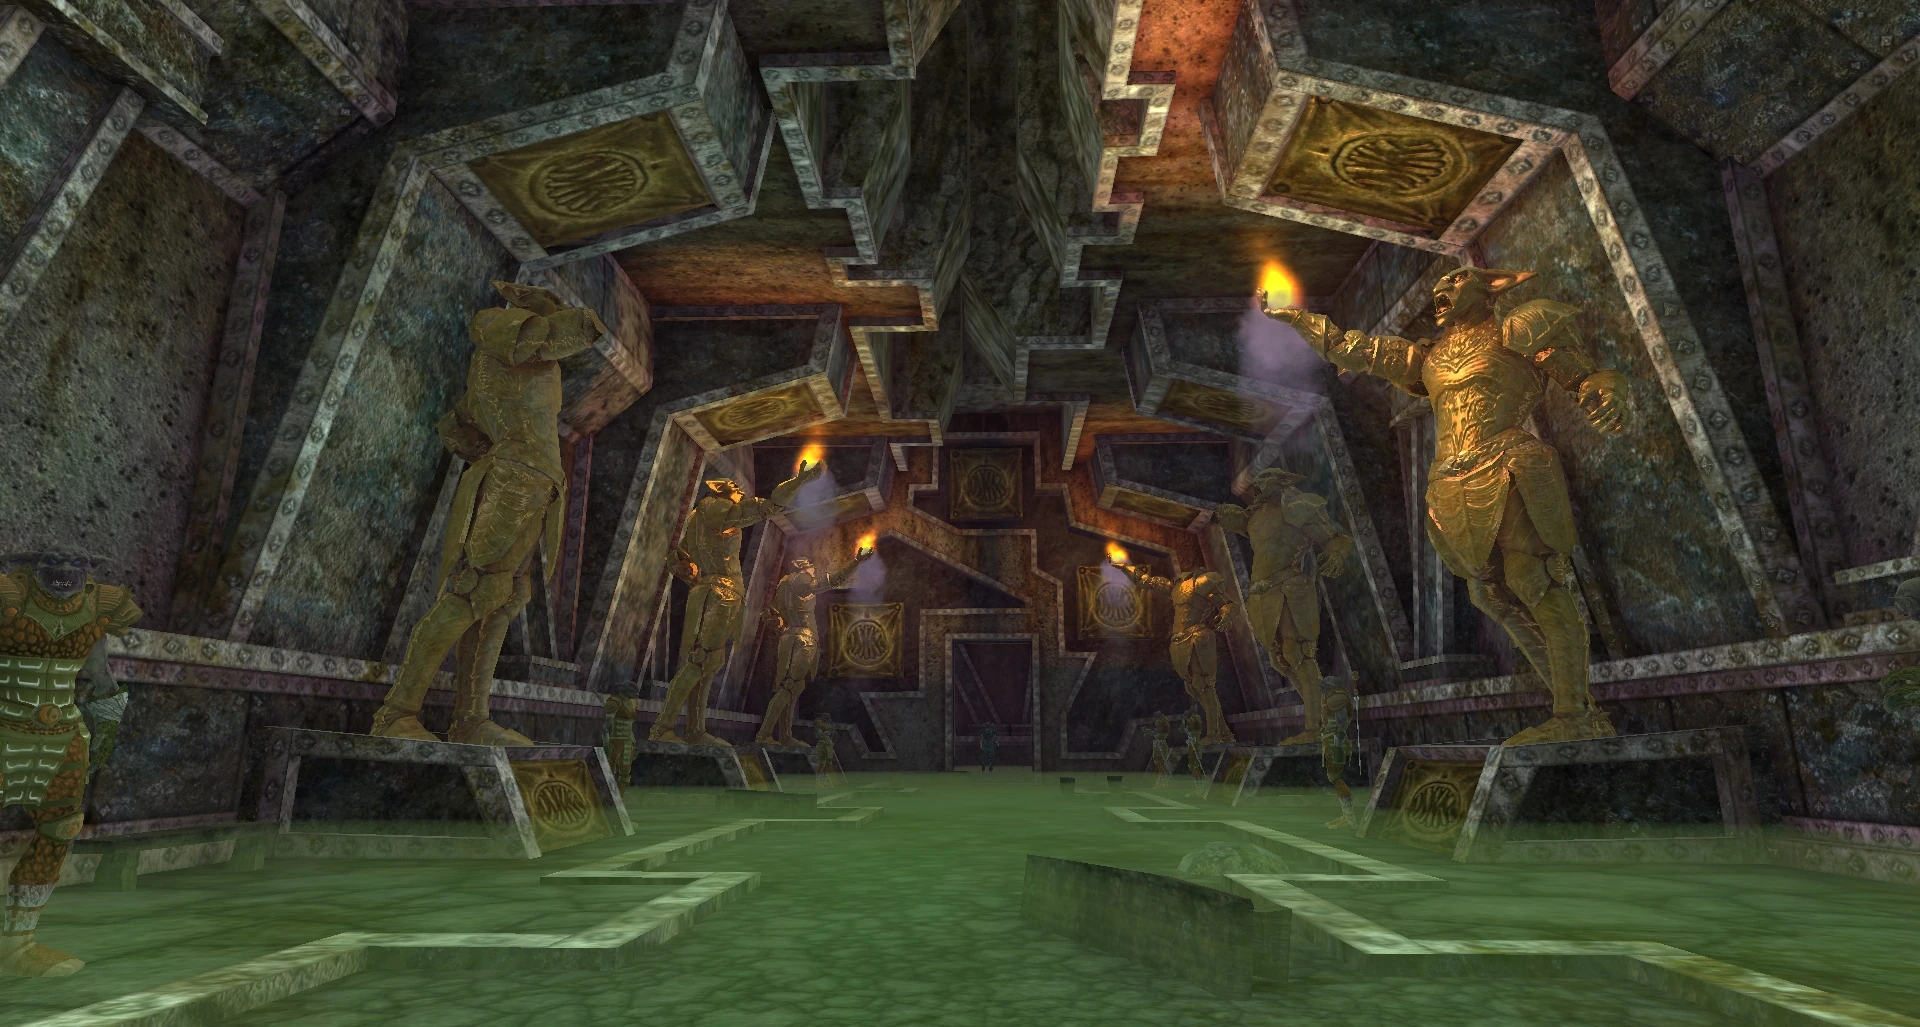
Zraxth is located at ( 36, -8, -384 ) Copy/waypoint 36.04, -8.16, -384.12 at the back of the top hall, and can Fear or Stifle. He doesn't have tons of HP, but his statue adds are nasty.
Clear the trash, then wait for Zraxth to become aggro (he does the villain monologue first).
There are four a golden warrior statues in the hall, one in each corner. These become aggro one by one, based on Zraxth's health (at %60, 50%, 40% and 30%), immediately casting a big AOE. The first is in the NE corner, then the sequence is clockwise. Sometimes (perhaps from a stifle?) a statue does not animate.
The statues are a bit nasty, so kill each as it animates before returning DPS to Zraxth. Having more than one statue up simultaneously is probably fatal.
A good strategy is to have the tank be next to the statue about to pop, and heal stacked, with the rest of the group backing away when the percentage is close.
Zraxth is immune to damage. You can either use a Chaos Spark from the forge for a 25 second buff that allows you to damage him, or else wait until he casts a noxious DOT that allows the recipient to damage him. Do not Cure DOTs!
If he Fears someone, watch for line-of-sight issues around the statues.
 . Speak to him. He will open the doors to follow-on areas as you proceed through the dungeon.
 . Loot his body to obtain the large skull key you will need to progress further in the zone.