(can't believe I forgot to include a "Similar Zones" table for this zone) |
m (zone rename, replaced: Bloodskull Valley: Excavation Site → Bloodskull Valley: The Excavation Site) |
||
| (9 intermediate revisions by 6 users not shown) | |||
| Line 1: | Line 1: | ||
| − | {{ZoneBox |
+ | {{ZoneBox| |
| + | zname = The Commonlands| |
||
| − | introduced = | |
||
| − | + | introduced = Shattered Lands| |
|
| − | levelrange = 10-20 |
+ | levelrange = 10-20| |
| − | azones = |
+ | azones = |
| + | via border: |
||
| − | *[[West Freeport]] |
||
| + | *[[The City of Freeport]] |
||
*[[Darklight Wood]] |
*[[Darklight Wood]] |
||
| + | *[[The Graveyard]] |
||
*[[Nektulos Forest]] |
*[[Nektulos Forest]] |
||
| + | *[[The Sprawl]] |
||
| − | *[[Tenebrous Tangle]] ... ''[[#Adjacent Zones|more]]''| |
||
| + | *[[The Thieves' Way]] |
||
| − | adungeons = |
||
| + | via Ulteran Spire: |
||
| − | *[[Wailing Caves|Wailing Caves]] |
||
| − | *[[ |
+ | *[[Tenebrous Tangle]]| |
| + | adungeons = |
||
| + | *[[Wailing Caves]] |
||
| + | *[[Fallen Gate]]| |
||
ainstances = |
ainstances = |
||
| + | *[[Befallen]] |
||
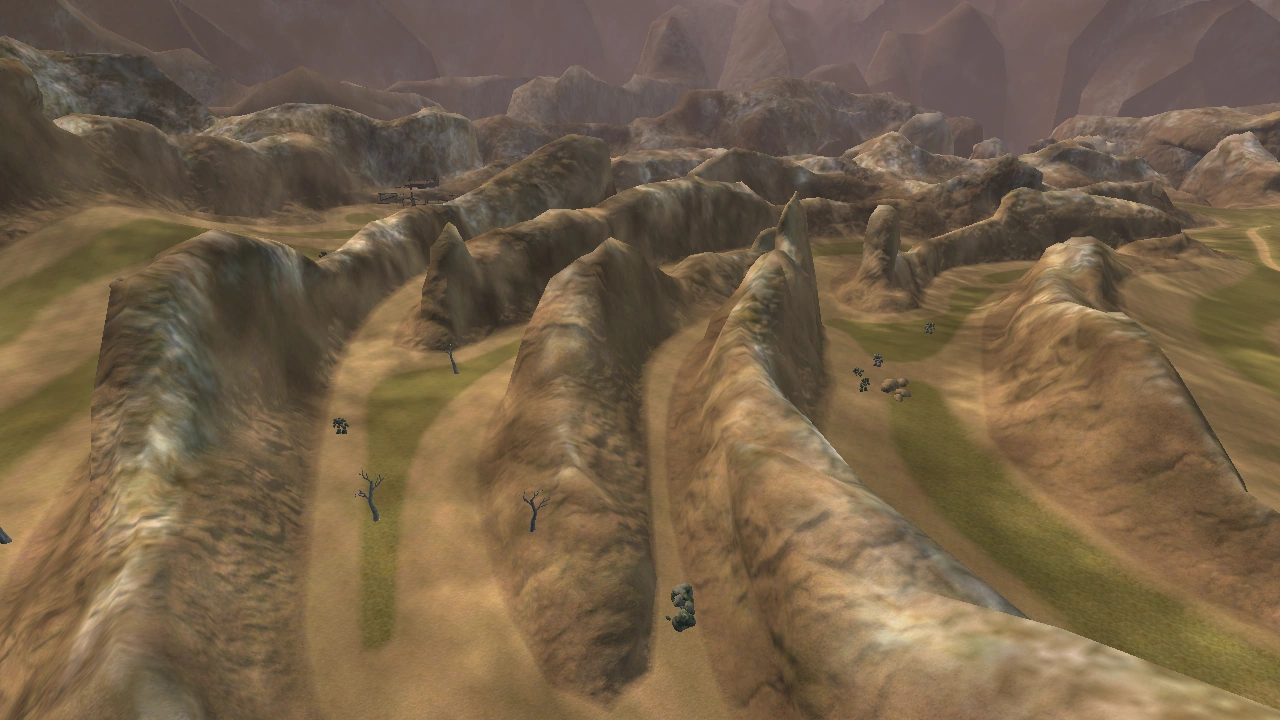
*[[Bloodskull Valley]] |
*[[Bloodskull Valley]] |
||
| + | *[[A decrepit crypt|Steelbone Family Crypt]] |
||
| − | *[[Valley of the Rogue Magi]] |
||
| − | *[[The Eternal Gorge]] |
+ | *[[The Eternal Gorge]] |
| + | *[[Gobblerock's Hideout]] |
||
| + | *[[Valley of the Rogue Magi]]| |
||
uid=23| |
uid=23| |
||
| + | image=TheCommonlands1.png| |
||
| − | image=City of Freeport from the Commonlands.jpg| |
||
| + | caption=''High noon in The Commonlands, with [[The Crossroads]] on the right and [[The City of Freeport]] on the left.''| |
||
| − | caption=| |
||
harvestnodetier=2| |
harvestnodetier=2| |
||
}} |
}} |
||
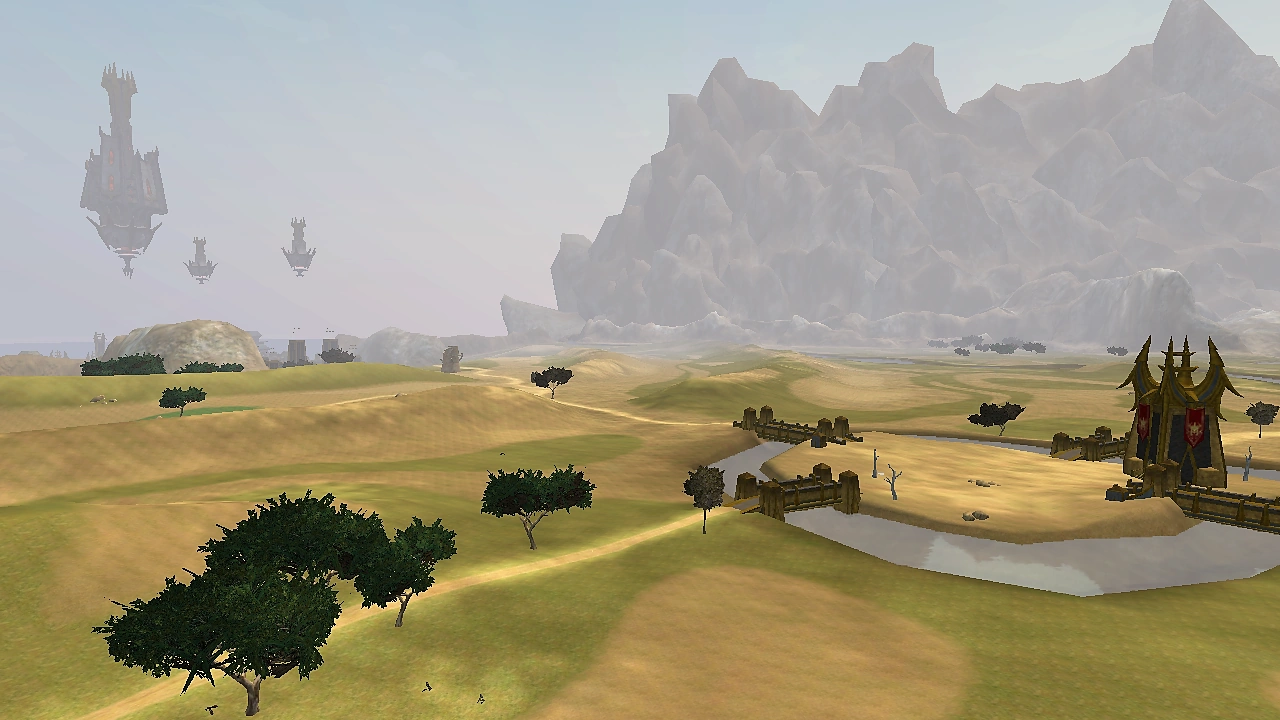
| + | {{Quote|The Commonlands is a vast arid land, but was not always so. This land that was once lush and vibrant has been ravaged by what some scholars say was the lingering death throw of the curse of [[Solusek Ro (Deity)|Solusek Ro]] that long ago destroyed the [[Eldarr Forest]]. The land is now ungracious to [[The City of Freeport|Freeportians]] and traveler alike. What little spots of hospitality that exist amidst the badlands and ruins are often contended for by beast, bandit and orc.|[[Bootstrutter's Field Guide to the Commonlands]]}} |
||
| − | <!-- borrowed paragraph from the Lore section-->This is a battle-scarred subtropical savanna. It is embraced by the titanic jagged mountains called Razorrock Ridge, located on the east side of the Shattered Lands upon the continent named D’Lere. Clumps of trees and kopjes are scattered throughout the landscape. Many battles have been waged on these lands and orc and human ruins are common sights amidst the beautiful and deadly land. |
||
| + | While [[the Commonlands]] appear to be just a backwater waste chosen by fate to host the great city of [[The City of Freeport|Freeport]], with a little [[The Commonlands Timeline|digging]], it's past glory can still be held. |
||
| − | == |
+ | ==Lore== |
| + | [[File:City_of_Freeport_from_the_Commonlands.jpg|thumb|280px|''The City of Freeport from The Commonlands'']] |
||
| − | The Commonlands was once a haven for the Deathfist Empire orc legions. The Deathfist Empire seemingly was driven from the Commonlands during the Battle of Defiance. As of the recent decade, the orcs have begun to make a presence in the region again. What brings them back is unknown. |
||
| + | Located on the east side of the [[Shattered Lands]] upon the continent [[D'Lere]], the region is a battle-scarred subtropical savanna. It is embraced by titanic jagged mountains called ''Razorrock Ridge'' and scattered with clumps of trees and kopjes. Many battles have been waged on these lands and [[:category:orc|orc]] and human ruins are common sights amidst the beautiful and deadly land. |
||
| + | Once this region was a haven for the [[:Category:The Deathfist Orcs (Faction)|Deathfist Empire]] orc legions. The Deathfist Empire seemingly was driven from The Commonlands during the [[Battle of Defiance]]. As of the recent decade, the orcs have begun to make a presence in the region again. What brings them back is unknown.'' - (Source: [[Cogglesworth's Tour of Norrath: Part 3|Official Everquest II lore]])'' |
||
| − | : ''- from [[Cogglesworth's Tour of Norrath: Part 3]] |
||
| − | == |
+ | ==Geography== |
| + | [[File:The_Crossroads.png|thumb|right|[[The Crossroads]]]] |
||
| − | The Commonlands are open plains and gentle hills, with almost no barriers to travel. Each large plain is dominated by specific types of creatures. Roads and streams crisscross the Commonlands and are mostly safe from dangers, and may be used by players to travel between each major section of the zone. |
||
| + | [[File:Valor's End.png|thumb|right|[[Valor's End]]]] |
||
| − | |||
| + | [[File:Yapping_Maze.png|thumb|right|[[Yapping Maze]]]] |
||
| − | === Travel === |
||
| + | [[File:Dead_Horse_Valley.png|thumb|right|[[Dead Horse Valley]]]] |
||
| − | Three griffon towers are available for fast travel between major sections of the Commonlands: |
||
| + | [[File:The_Siege_Lands.png|thumb|right|[[The Siege Lands]]]] |
||
| − | * {{POI|Freeport Station}} |
||
| + | [[File:The Captain's Deck.png|thumb|right|[[The Captain's Deck]]]] |
||
| − | * {{POI|Nektulos Forest Station}} |
||
| + | [[File:Dead Man's Valley.png|thumb|right|[[Dead Man's Valley]]]] |
||
| − | * {{POI|Hidden Canyon Station}} |
||
| + | [[File:Lucan's Mount.png|thumb|right|[[Lucan's Mount]]]] |
||
| − | |||
| + | The Commonlands are open plains and gentle hills, with almost no barriers to travel. Each large plain is dominated by specific types of creatures. Roads and streams crisscross the region and are mostly safe from danger. They can be used by players to travel undisturbed between each major section of the zone. |
||
| − | The Commonlands dock is a travel hub, giving quick access to three of the Freeport city zones, and all of Freeport's suburbs and adventure districts. It also gives direct access to Nektulos Forest docks, Thundering Steppes docks, and Freeport Guild Halls. |
||
| + | ===Map=== |
||
| − | |||
| − | The {{POI|Ulteran Spires (CL)|Ulteran Spires}} located just west of the {{POI|Crossroads}} allow travel to the [[Tenebrous Tangle]] in the Overrealm. |
||
| − | |||
| − | === Map === |
||
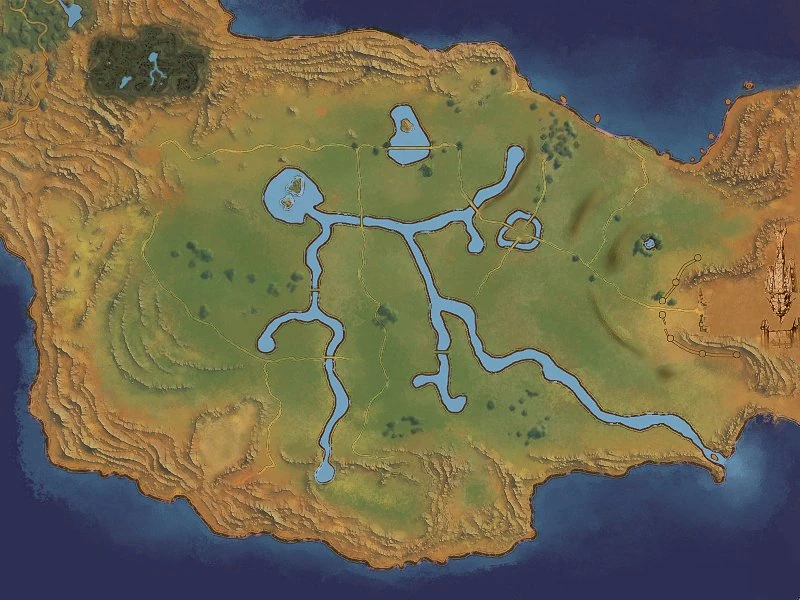
[[Image:The Commonlands.jpg|300px|Map of The Commonlands]] |
[[Image:The Commonlands.jpg|300px|Map of The Commonlands]] |
||
| + | ===Travel=== |
||
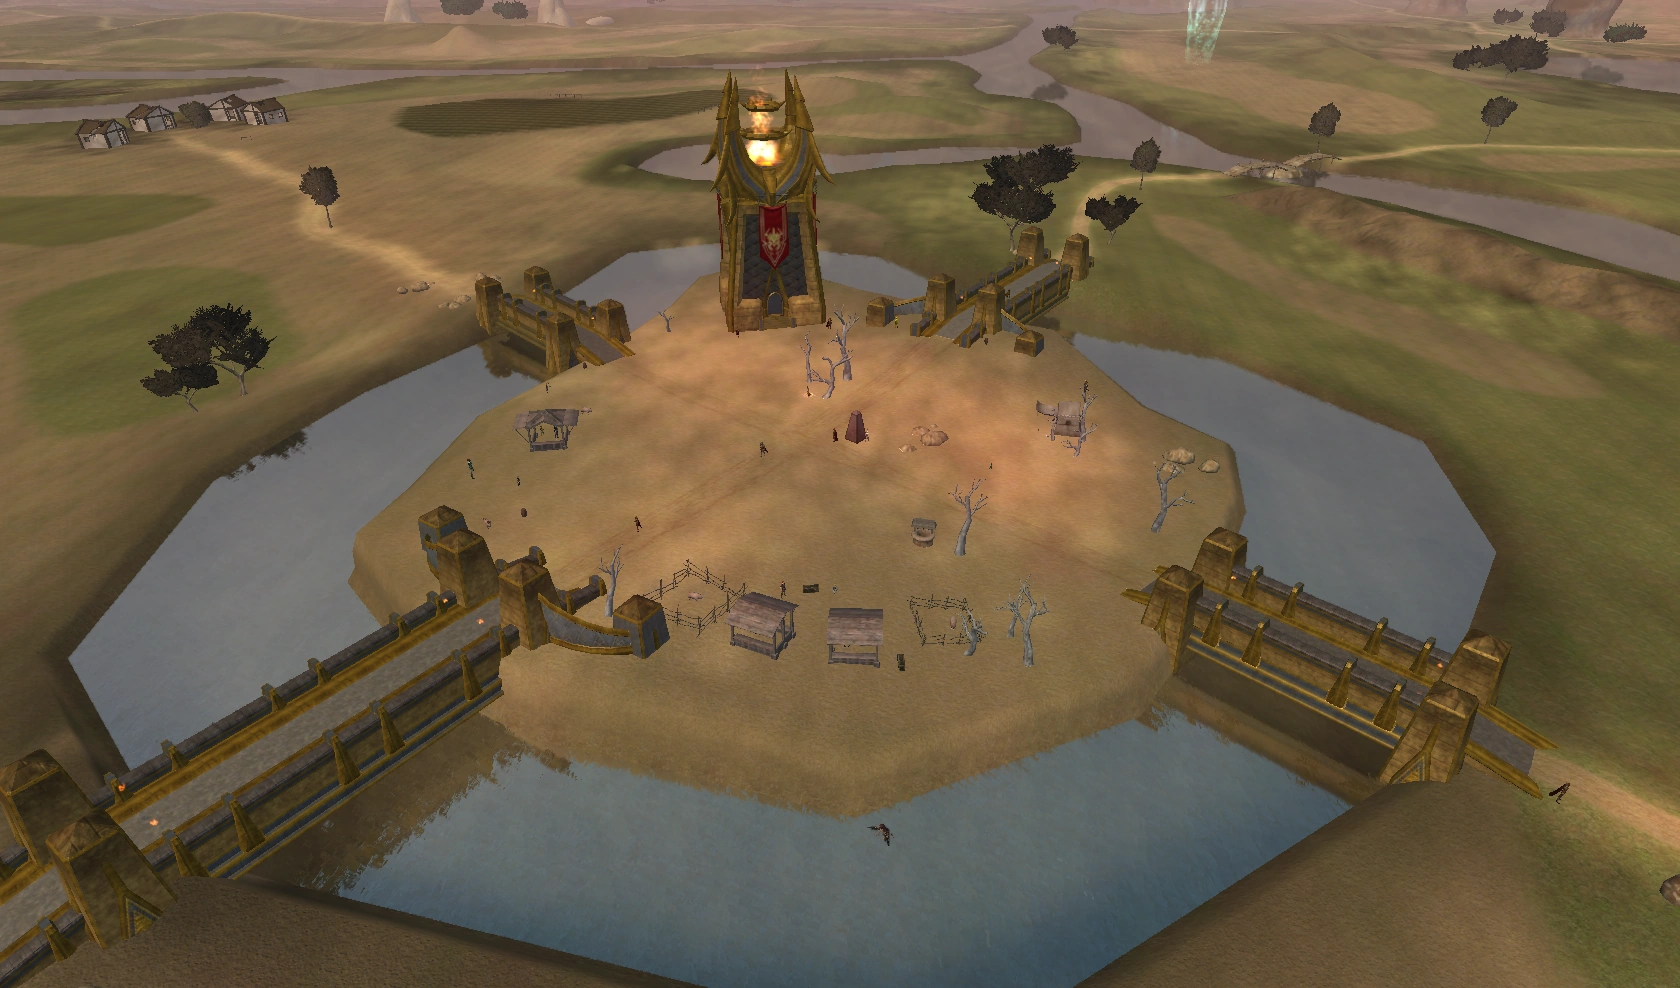
| + | Three griffon towers are available for fast travel between major sections of The Commonlands: {{POI|Freeport Station}}, {{POI|Nektulos Forest Station}}, and {{POI|Hidden Canyon Station}}. The Commonlands [[Fisherman's Dock|dock]] is a travel hub, giving quick access to three regions within Freeport. Additionally, it gives direct access to [[Nektulos Forest]] docks, [[The Thundering Steppes]] docks, and Freeport Guild Halls. Finally, the {{POI|Ulteran Spires (CL)|Ulteran Spires}} located just west of {{POI|The Crossroads}} allow travel to the [[Tenebrous Tangle]] in the [[Overrealm]]. |
||
| + | The zone's [[Mariner's Bell]] is on the docks at {{loc|-1052|-145|-679}}. |
||
| − | === City === |
||
| + | ===Towns=== |
||
| − | The city of [[Freeport]] is located at the east end of this zone. |
||
| + | *[[The City of Freeport]] is located at the east end of the zone, with the gate into [[West Freeport (POI)|West Freeport]] at {{loc|-1326|-88|45}}. |
||
| + | *[[The Crossroads]] {{loc|-528|-43|-276}} is the major trading post for travelers arriving from Darklight Wood and Nektulos Forest on their way to Freeport. |
||
| + | ===Adjacent Zones=== |
||
| + | {{SmallTable}} |
||
| + | ! Zone Name |
||
| + | ! Level Range |
||
| + | ! Direction |
||
| + | ! Access |
||
| + | |- |
||
| + | | [[The City of Freeport]] |
||
| + | | N/A |
||
| + | | East |
||
| + | | {{loc|-1326|-88|45}} |
||
| + | |- |
||
| + | | [[The Graveyard]] |
||
| + | | 5-10 |
||
| + | | East |
||
| + | | {{loc|-1389|-86|-333}} |
||
| + | |- |
||
| + | | [[The Sprawl]] |
||
| + | | 5-10 |
||
| + | | East |
||
| + | | {{loc|-1449|-81|418}} |
||
| + | |- |
||
| + | | [[The Thieves' Way]] |
||
| + | | 5-10 |
||
| + | | East |
||
| + | | {{loc|-1,251|-83|119}} |
||
| + | |- |
||
| + | | [[Darklight Wood]] |
||
| + | | 1-20 |
||
| + | | North |
||
| + | | {{loc|192|-46|-862}} |
||
| + | |- |
||
| + | | [[Nektulos Forest]] |
||
| + | | 20-30 |
||
| + | | Northwest |
||
| + | | {{loc|1112|-42|-636}} |
||
| + | |} |
||
| + | ===Revive Locations=== |
||
{{SmallTable}} |
{{SmallTable}} |
||
| + | ! Revive Location |
||
| − | ! City Name |
||
| + | ! Cardinal Direction |
||
| − | ! Alignment |
||
| − | ! Location |
||
|- |
|- |
||
| − | | |
+ | | Freeport Gates |
| − | | |
+ | | East |
| + | |- |
||
| − | | East end of road from {{POI|Crossroads}} |
||
| + | | {{POI|The Crossroads}} |
||
| + | | Central |
||
| + | |- |
||
| + | | {{POI|The Lonely Tower}} |
||
| + | | Southeast |
||
| + | |- |
||
| + | | {{POI|East Nomad Camp}} |
||
| + | | Northcentral |
||
| + | |- |
||
| + | | {{POI|Druid Plain}} |
||
| + | | West |
||
|} |
|} |
||
| − | == |
+ | ==Dungeons== |
{{SmallTable}} |
{{SmallTable}} |
||
! Dungeon Name |
! Dungeon Name |
||
| Line 62: | Line 121: | ||
! Target Audience |
! Target Audience |
||
! Zone Type |
! Zone Type |
||
| + | ! Location |
||
| − | ! Typical Duration |
||
| + | ! Timeline |
||
|- |
|- |
||
| [[Wailing Caves]] |
| [[Wailing Caves]] |
||
| 11-18 |
| 11-18 |
||
| Group |
| Group |
||
| + | | Public |
||
| − | | Shared Dungeon |
||
| + | | {{loc|-206|-43|-916}} |
||
| − | | 45 minutes |
||
| + | | [[Wailing Caves Timeline]] |
||
|- |
|- |
||
| [[Fallen Gate]] |
| [[Fallen Gate]] |
||
| 18-26 |
| 18-26 |
||
| Group |
| Group |
||
| + | | Public |
||
| − | | Shared Dungeon |
||
| + | | {{loc|1483|-38|-402}} |
||
| − | | 1 hour |
||
| + | | [[Fallen Gate Timeline]] |
||
| + | |- |
||
| + | |} |
||
| + | |||
| + | ==Instances== |
||
| + | {{SmallTable}} |
||
| + | ! Instance Name |
||
| + | ! Level Range |
||
| + | ! Target Audience |
||
| + | ! Location |
||
| + | |- |
||
| + | | [[A decrepit crypt|Steelbone Family Crypt]] |
||
| + | | 10-12 |
||
| + | | Solo |
||
| + | | {{loc|-1332|-69|333}} |
||
|- |
|- |
||
| [[Valley of the Rogue Magi]] |
| [[Valley of the Rogue Magi]] |
||
| 15-20 |
| 15-20 |
||
| Solo |
| Solo |
||
| + | | {{loc|679|-52|448}} |
||
| − | | Instance |
||
| − | | 30 minutes |
||
|- |
|- |
||
| [[The Eternal Gorge]] |
| [[The Eternal Gorge]] |
||
| 18-23 |
| 18-23 |
||
| + | | Solo |
||
| + | | {{Loc|906|-9.67|-516.9|}} |
||
| + | |- |
||
| + | | [[Bloodskull Valley: The Excavation Site]] |
||
| + | | 15-17 |
||
| + | | Solo |
||
| + | | {{loc|0|-48|726}} |
||
| + | |- |
||
| + | | [[Bloodskull Valley: The Training Grounds]] |
||
| + | | 17-21 |
||
| + | | Solo |
||
| + | | " |
||
| + | |- |
||
| + | | [[Bloodskull Valley: Maulic's Stronghold]] |
||
| + | | 20+ |
||
| + | | Raid x2 |
||
| + | | " |
||
| + | |- |
||
| + | | [[Gobblerock's Hideout]] |
||
| + | | 25-40 |
||
| Group |
| Group |
||
| + | | {{loc|-1415|-70|234}} |
||
| − | | Instance |
||
| − | | 30 minutes |
||
|- |
|- |
||
| [[Befallen: Cavern of the Afflicted]] |
| [[Befallen: Cavern of the Afflicted]] |
||
| − | | 50- |
+ | | 50-90 (scales) |
| Group |
| Group |
||
| + | | {{loc|637|-64|768}} |
||
| − | | Instance |
||
| − | | 90 minutes |
||
|- |
|- |
||
| [[Befallen: Halls of the Forsaken]] |
| [[Befallen: Halls of the Forsaken]] |
||
| − | | 50- |
+ | | 50-90 (scales) |
| Group |
| Group |
||
| − | | |
+ | | " |
| − | | 90 minutes |
||
|- |
|- |
||
| [[Befallen: Necrotic Asylum]] |
| [[Befallen: Necrotic Asylum]] |
||
| − | | 50- |
+ | | 50-90 (scales) |
| Group |
| Group |
||
| − | | |
+ | | " |
| + | |- |
||
| − | | 90 minutes |
||
| + | | [[Tomb of the Mad Crusader]] |
||
| + | | 80 |
||
| + | | Raid x4 |
||
| + | | " |
||
|} |
|} |
||
| + | ==Quests == |
||
| − | === Adjacent Zones === |
||
| + | :''See: [[The Commonlands Timeline]]'' |
||
| − | {{SmallTable}} |
||
| − | ! Zone Name |
||
| − | ! Level Range |
||
| − | ! Direction |
||
| − | ! Access |
||
| − | |- |
||
| − | | [[The Graveyard]] |
||
| − | | 5-10 |
||
| − | | Northeast |
||
| − | | city gate at {{POI|The Siege Lands}} |
||
| − | |- |
||
| − | | [[The Ruins]] |
||
| − | | 10-15 |
||
| − | | Southeast |
||
| − | | city gate near {{POI|The Lonely Tower}} |
||
| − | |- |
||
| − | | [[Darklight Wood]] |
||
| − | | 1-20 |
||
| − | | North |
||
| − | | follow road north from {{POI|Shiv Lane}} |
||
| − | |- |
||
| − | | [[Nektulos Forest]] |
||
| − | | 20-30 |
||
| − | | Northwest |
||
| − | | follow road northwest from {{POI|Nektulos Forest Station}} |
||
| − | |} |
||
| + | ==Similar Zones== |
||
| − | === Revive Locations === |
||
| − | {{SmallTable}} |
||
| − | ! Revive Location |
||
| − | ! Description |
||
| − | |- |
||
| − | | Freeport Gates |
||
| − | | Just uphill from the city gate, near {{POI|Dog Pond}} |
||
| − | |- |
||
| − | | {{POI|Crossroads}} |
||
| − | | the most central location |
||
| − | |- |
||
| − | | {{POI|The Lonely Tower}} |
||
| − | | nearest spawn point to [[The Ruins]] |
||
| − | |- |
||
| − | | {{POI|East Nomad Camp}} |
||
| − | | nearest spawn point to [[Wailing Caves]] |
||
| − | |- |
||
| − | | {{POI|Druid Plain}} |
||
| − | | nearest spawn point to [[Fallen Gate]] |
||
| − | |} |
||
| − | |||
| − | == Quests == |
||
| − | Quests are found throughout this zone, often in unexpected places, such as an overturned boat or a logpile. The main quest line leads players from the Freeport gates through almost all major quest areas, giving players opportunities to discover most other quest lines in the zone. |
||
| − | * See [[The Commonlands Timeline]]. |
||
| − | |||
| − | The {{POI|Crossroads}} is the largest quest hub in the Commonlands. Another good opportunity for quests lies nearby in the adjacent zone of [[Darklight Wood]], where more than forty quests can be found at {{POI|Wanderlust Fair}} at the same level range as the Commonlands. |
||
| − | |||
| − | == Similar Zones == |
||
{{SmallTable}} |
{{SmallTable}} |
||
! Zone Name |
! Zone Name |
||
| Line 172: | Line 216: | ||
| 1-20 |
| 1-20 |
||
| [[Shattered Lands]] |
| [[Shattered Lands]] |
||
| + | | Evil-alignment |
||
| − | | Close by and a good complement for The Commonlands |
||
|- |
|- |
||
| [[Timorous Deep]] |
| [[Timorous Deep]] |
||
| 1-20 |
| 1-20 |
||
| [[Kunark]] |
| [[Kunark]] |
||
| + | | Evil-alignment |
||
| − | | Another outstanding zone for quests, with great rewards |
||
| + | |- |
||
| + | | [[Greater Faydark]] |
||
| + | | 1-20 |
||
| + | | [[Faydwer]] |
||
| + | | Good-alignment |
||
| + | |- |
||
| + | | [[Frostfang Sea]] |
||
| + | | 1-20 |
||
| + | | [[Shattered Lands]] |
||
| + | | Good-alignment |
||
|- |
|- |
||
| [[Antonica]] |
| [[Antonica]] |
||
| 10-20 |
| 10-20 |
||
| [[Shattered Lands]] |
| [[Shattered Lands]] |
||
| + | | Good-alignment; counterpart to The Commonlands |
||
| − | | Unsafe for evil characters |
||
| + | |- |
||
|} |
|} |
||
| + | |||
| + | ==Collections== |
||
| + | *[[Commonlands shrub leaves collection]] |
||
| + | *[[Chipped shards collection]] |
||
| + | *[[Scuffed shards collection]] |
||
| + | *[[Shattered bone fragments collection]] |
||
| + | *[[Cracked bone fragments collection]] |
||
Revision as of 20:00, 11 February 2019
| The Commonlands | |||||||||
|---|---|---|---|---|---|---|---|---|---|
| Levels 10-20 | |||||||||
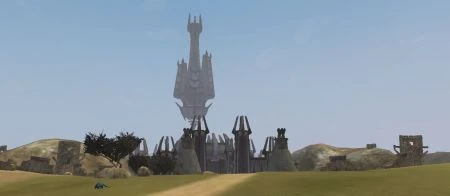
 High noon in The Commonlands, with The Crossroads on the right and The City of Freeport on the left. | |||||||||
| Introduced | Shattered Lands | ||||||||
| Zone Type | Public | ||||||||
| Adjacent to | via border:
via Ulteran Spire: | ||||||||
| Dungeons | |||||||||
| Instances | |||||||||
| Quest Lines | The Commonlands Timeline | ||||||||
| Harvesting | Tier 2 | ||||||||
| |||||||||
NOTE:  A discussion page exists which may contain more information
| “ | The Commonlands is a vast arid land, but was not always so. This land that was once lush and vibrant has been ravaged by what some scholars say was the lingering death throw of the curse of Solusek Ro that long ago destroyed the Eldarr Forest. The land is now ungracious to Freeportians and traveler alike. What little spots of hospitality that exist amidst the badlands and ruins are often contended for by beast, bandit and orc. | ” |
While the Commonlands appear to be just a backwater waste chosen by fate to host the great city of Freeport, with a little digging, it's past glory can still be held.
Lore
The City of Freeport from The Commonlands
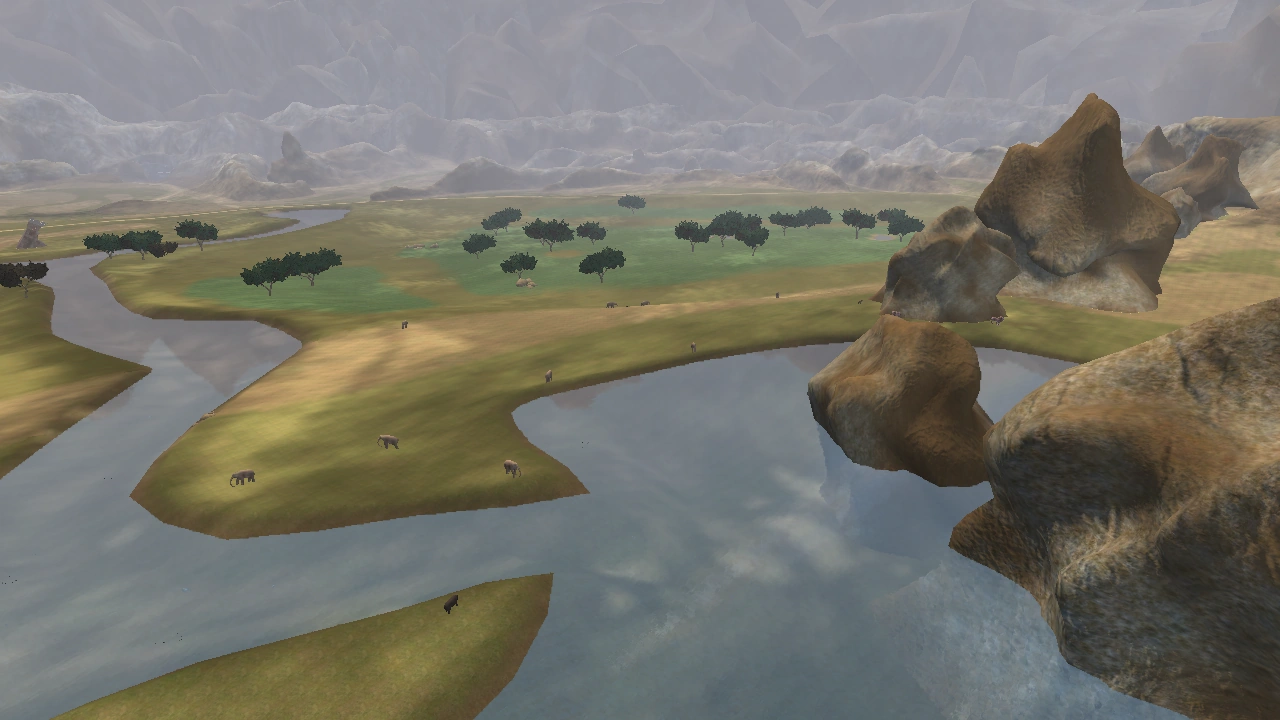
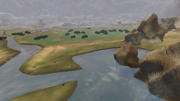
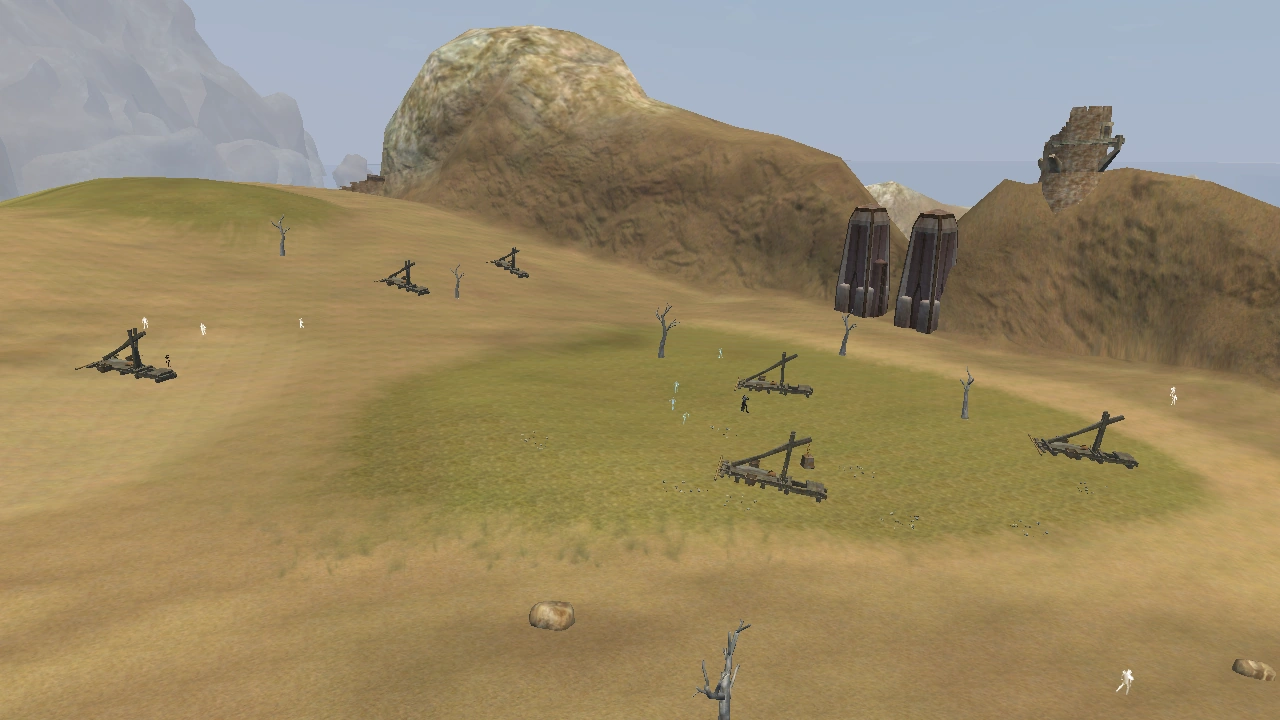
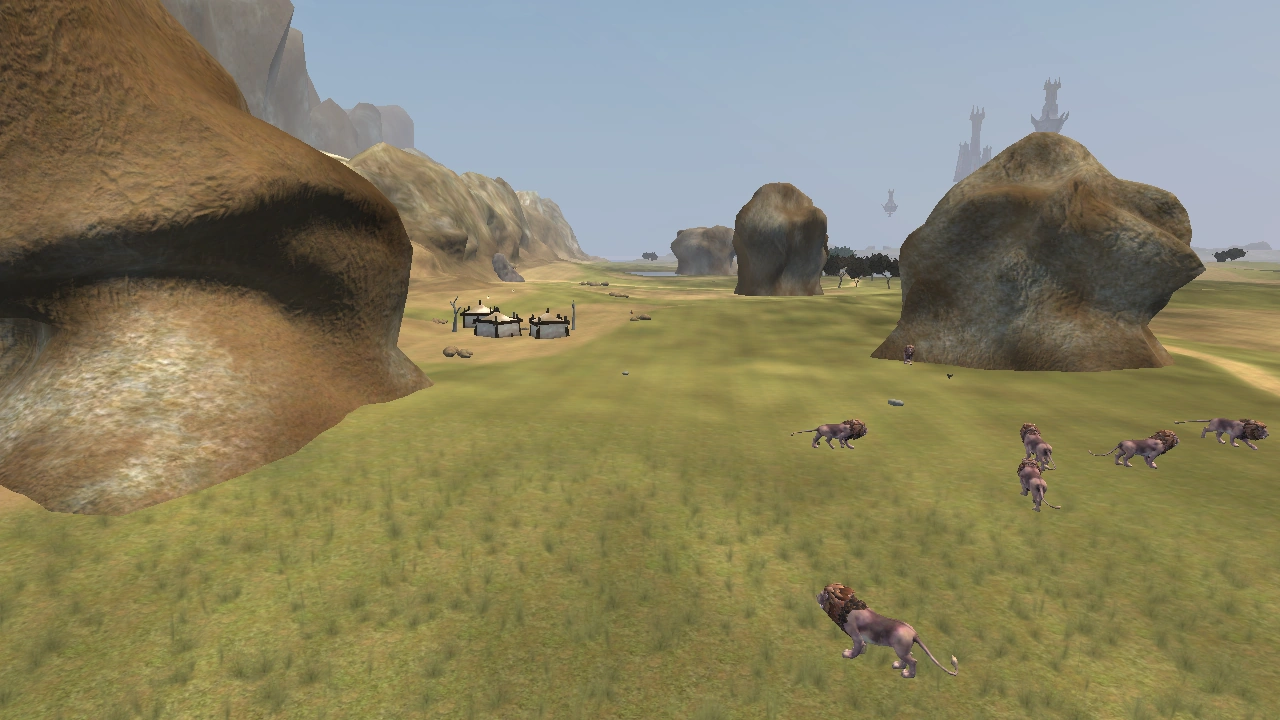
Located on the east side of the Shattered Lands upon the continent D'Lere, the region is a battle-scarred subtropical savanna. It is embraced by titanic jagged mountains called Razorrock Ridge and scattered with clumps of trees and kopjes. Many battles have been waged on these lands and orc and human ruins are common sights amidst the beautiful and deadly land.
Once this region was a haven for the Deathfist Empire orc legions. The Deathfist Empire seemingly was driven from The Commonlands during the Battle of Defiance. As of the recent decade, the orcs have begun to make a presence in the region again. What brings them back is unknown. - (Source: Official Everquest II lore)
Geography


The Commonlands are open plains and gentle hills, with almost no barriers to travel. Each large plain is dominated by specific types of creatures. Roads and streams crisscross the region and are mostly safe from danger. They can be used by players to travel undisturbed between each major section of the zone.
Map
Travel
Three griffon towers are available for fast travel between major sections of The Commonlands: Freeport Station, Nektulos Forest Station, and Hidden Canyon Station. The Commonlands dock is a travel hub, giving quick access to three regions within Freeport. Additionally, it gives direct access to Nektulos Forest docks, The Thundering Steppes docks, and Freeport Guild Halls. Finally, the Ulteran Spires located just west of The Crossroads allow travel to the Tenebrous Tangle in the Overrealm.
The zone's Mariner's Bell is on the docks at ( -1052, -145, -679 ) .
Towns
- The City of Freeport is located at the east end of the zone, with the gate into West Freeport at ( -1326, -88, 45 ) .
- The Crossroads ( -528, -43, -276 ) is the major trading post for travelers arriving from Darklight Wood and Nektulos Forest on their way to Freeport.
Adjacent Zones
| Zone Name | Level Range | Direction | Access |
|---|---|---|---|
| The City of Freeport | N/A | East | ( -1326, -88, 45 ) |
| The Graveyard | 5-10 | East | ( -1389, -86, -333 ) |
| The Sprawl | 5-10 | East | ( -1449, -81, 418 ) |
| The Thieves' Way | 5-10 | East | ( -1251, -83, 119 ) |
| Darklight Wood | 1-20 | North | ( 192, -46, -862 ) |
| Nektulos Forest | 20-30 | Northwest | ( 1112, -42, -636 ) |
Revive Locations
| Revive Location | Cardinal Direction |
|---|---|
| Freeport Gates | East |
| The Crossroads | Central |
| The Lonely Tower | Southeast |
| East Nomad Camp | Northcentral |
| Druid Plain | West |
Dungeons
| Dungeon Name | Level Range | Target Audience | Zone Type | Location | Timeline |
|---|---|---|---|---|---|
| Wailing Caves | 11-18 | Group | Public | ( -206, -43, -916 ) | Wailing Caves Timeline |
| Fallen Gate | 18-26 | Group | Public | ( 1483, -38, -402 ) | Fallen Gate Timeline |
Instances
| Instance Name | Level Range | Target Audience | Location |
|---|---|---|---|
| Steelbone Family Crypt | 10-12 | Solo | ( -1332, -69, 333 ) |
| Valley of the Rogue Magi | 15-20 | Solo | ( 679, -52, 448 ) |
| The Eternal Gorge | 18-23 | Solo | ( 906, -10, -517 ) |
| Bloodskull Valley: The Excavation Site | 15-17 | Solo | ( 0, -48, 726 ) |
| Bloodskull Valley: The Training Grounds | 17-21 | Solo | " |
| Bloodskull Valley: Maulic's Stronghold | 20+ | Raid x2 | " |
| Gobblerock's Hideout | 25-40 | Group | ( -1415, -70, 234 ) |
| Befallen: Cavern of the Afflicted | 50-90 (scales) | Group | ( 637, -64, 768 ) |
| Befallen: Halls of the Forsaken | 50-90 (scales) | Group | " |
| Befallen: Necrotic Asylum | 50-90 (scales) | Group | " |
| Tomb of the Mad Crusader | 80 | Raid x4 | " |
Quests
Similar Zones
| Zone Name | Level Range | Region | Notes |
|---|---|---|---|
| Darklight Wood | 1-20 | Shattered Lands | Evil-alignment |
| Timorous Deep | 1-20 | Kunark | Evil-alignment |
| Greater Faydark | 1-20 | Faydwer | Good-alignment |
| Frostfang Sea | 1-20 | Shattered Lands | Good-alignment |
| Antonica | 10-20 | Shattered Lands | Good-alignment; counterpart to The Commonlands |