m (→Alternate Strat: Moving the not out of this section to its own section as it has nothing to do with the strat) |
(Instanced zone with lockout) |
||
| Line 9: | Line 9: | ||
instance - zone difficulty/instancing. Public, Solo, Group, or Raid |
instance - zone difficulty/instancing. Public, Solo, Group, or Raid |
||
--> |
--> |
||
| + | {{IZoneInformation| |
||
| − | {{ZoneInformation| |
||
abbrev= BoF| |
abbrev= BoF| |
||
introduced = | |
introduced = | |
||
levelrange = 55| |
levelrange = 55| |
||
azones = [[Solusek's Eye]]| |
azones = [[Solusek's Eye]]| |
||
| − | instance = Group |
+ | instance = Group| |
| + | flock = none| |
||
| + | slock = 18 hours |
||
}} |
}} |
||
Revision as of 01:36, 6 May 2008
|
| |||||||||||||||||||||
| |||||||||||||||||||||
What does this information mean?
Overview
When you zone in, you will be on a translucent platform in the center of the one-room zone. There are four small circular platforms around the edge of the room (above a stripe of lava) and a switch rising up from the large middle floor.
You will fight a total of five creatures inside this zone, all of whom are Level 55 ^^^ very tall Efrit:
Activate the switch on the main floor to spawn four large glass bottles, one on each of the little satellite platforms.
Fighting The First Four
At that point, each of the first four combat cycles follows the same pattern:
1. Load the entire group onto one of the little satellite platforms. You can arrange your group onto any platform but you should get practice fighting with everybody in the same place, because by the fourth battle there will only be one platform left.
2. Click the bottle to spawn one of the first four Lords above. Over the next several seconds as you fight, the level of the lava in the room will rise to cover the middle platform, making the satellite platforms the only way to survive being in the room. ***IMPORTANT*** Once the mob has spawned DO NOT MOVE! Don't even jump! You may attack and use spells, but don't touch the movement keys.
3. As soon as the mob is dead, the room's lava level will reset, and the platform you're standing on will sink rapidly into the stripe of lava that's underneath it. You have roughly one second after the mob's death to leap screaming back onto the main floor area. The respawn point if not revived in the room is the teleporter area on Level 4 of Solusek's Eye, near where the Speaker of Fates stands. Corpses are placed on the rim of the main floor, and can be revived.
Fighting Djarn and Exiting
When all four bottles, platforms and Lords have been disposed of, a little disk will descend from the ceiling bearing a fifth glass bottle. When clicked, this will spawn Efreeti Lord Djarn, who is needed to complete the Saving Soles heritage quest. As before, the lava in the room will rise when the fight begins, so make sure you load everyone onto the little platform before spawning Djarn.
With Djarn dead, load everyone onto the little disk that held his bottle, and use the switch-on-a-stick to lift everyone up and out of the zone. Anyone who gets left behind because they weren't paying attention when the rest of the group climbed on and departed, can wait for the disk to completely rise, and then use the switch to summon it down again.
Note: killing Djarn will set an 18-hour lockout timer on the zone.
Alternate Strat
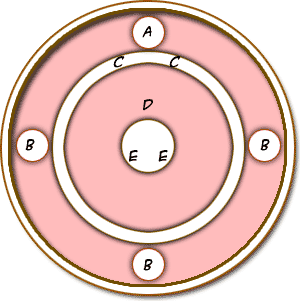
"A" in the image is the bottle you are about to activate in order to summon the next Djinn. A person at location "C" will activate the bottle. Usually, back-stabbers and non-tanking melee should stand there. The idea is that the Djinn will move forward (hopefully to the tank, but even if it moves to the people at "E", the hit box for the Djinn is large enough that the back stabbers will still be able to hit the mob).
The basic strategy is to place rogues at "C", the tank at "D" and everyone else at "E".
"B" are the other bottles, which you will not be fighting.
When the "A" bottle is activated, the lava will begin to rise and this strat has you standing directly in it (at least the tank, anyway). But here is the key - lava damage is not checked until you move. Even after all the recent lava changes, if you do not strafe, move forward or backward, you will take no damage whatsoever from the lava. You are allowed to rotate safely.
Activate "A", stand still, have the tank taunt and then do your normal "dirty" until the Djinn dies. At death, the lava in the room will reset and you will be fine. Rotate the set up so that another bottle is in the "A" position (by rotating your party) and repeat.
Once the middle platform descends, simply move everyone back so that the rogues are at one side of the middle platform, the tank at the opposite side and the rest on an edge some where. Do the fight again (still standing in the scary-but-safe lava). Once the last mob Djinn is dead, leave by way of the middle platform (click the button you clicked to summon the original bottles).
NOTE/WARNING
The defiler spell Abominus can assist you in finding a bug in this zone. Namely, under the thin layer of lava is a fall through spot. There is actually nothing under the lava away from the platforms or under the main platform, which can be replicated and discovered by moving around on the bottom of the lava with Abominus on. Note that it appears to be possible to do this with regular swimming assuming you can survive the lava.