|
| Journal Category | Miscellaneous (AA) | ||||
| Introduced | Rise of Kunark | ||||
| Journal Level | 70 (Tier 8) | ||||
| Journal Difficulty | Solo | ||||
| Starting Zone | Kylong Plains more | ||||
| How to Start | Talk to Taskmaster Greeblentus in Teren's Grasp | ||||
| |||||
NOTE:  A discussion page exists which may contain more information A discussion page exists which may contain more information
| |||||
What does this information mean?
Provisions Cache Points Map
Requirements
Must be at least a level 70 artisan to get this quest.
Steps
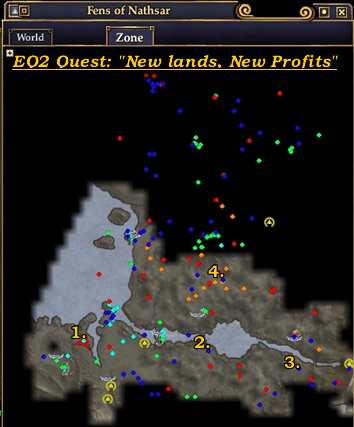
- Locate Fens of Nathsar ( -913, 99, -1061 ) in Kylong Plains
- Inside Fens of Nathsar:
- Refill first provision cache ( 790, 38, 1041 ) .
- Refill second provision cache ( -798, -129, 1171 ) .
- Refill third provision cache ( -1936, -94, 1381 ) .
- Refill fourth provision cache ( -980, -98, 303 ) .
- Return to Taskmaster Greeblentus ( 2114, 520, -911 ) in Teren's Grasp
Surviving The Quest as a Low Level Adventurer
The Fens is a dangerous place if you're a low level adventurer. If you bring an escort of high level friends along, you'll have a much easier time with this quest because they can remove dangerous obstacles. However, if you're friendless or just have a deep desire to defy death, the quest can be done solo (even if you're so low level that you can't use invisibility totems or abilities).
Getting to the Fens from the Kunzar Jungle sokokar post is fairly straightforward. Stick mostly to the road and you'll have no trouble. There are occasional spots where a mob in the grass will wander close to the road, but you should be able to wait for them to move, or run just past the far side of the road to avoid them. When the road ends, cross the river and then time the rest of your journey, waiting for monsters to separate so you can run between them.
REMEMBER TO ACTIVATE THE SOKOKAR POST AT THE FENS ENTRANCE!!! Otherwise, you have to make that long, scary run all over again if you call home and have to return to the Fens.
The first cache is up along the road toward Bathezid's Watch. Keep an eye out for roving Bathezids, and you'll have no trouble.
The second crate is east along the river. Stick to the road as best you can. There are rhino-riding Rilisian sentries on the road, so you'll need to find empty pockets between monsters near the road so you can run past the road guards. When you get near the Rilisian's bridge, you'll see a little path on the right that continues east along the river. Take that path. When you get near the crate, you'll need to be observant about where the monsters are. You may need to go a bit too far along the path, and then work your way back toward the river and the crate, in order to find an opportunity to get between the monsters. If you try to go straight up to the crate, you may discover that the monsters just won't give you a chance to get there safely.
Crates three and four are the same kind of thing: follow the road, and when you get close, look for a place that's wide enough to sneak past the monsters. It can take a few minutes to get an idea of where the open areas are created.
Rewards
- Tradeskill experience
- At least 7g 37s 19c
- Completing this quest gives +1249 faction with Riliss
- Completing this quest gives +250 faction with Bathezid's Watch